QEMU UEFI Boot
SeaBIOS and bootloaders are so old-school. All the cool kids are using UEFI. The coolest kids are using UKIs.
Even having installed linux on plenty of machines before, the boot process is entirely opaque to me. The most I have ever done is held F2 and change the boot order in the 90s retro bios menu to put my USB flash drive at the top of the list.
I have spent a lot of time working on a tool for building and running virtual machines via QEMU. Local VMs have become invaluable to me for testing kernel changes or working on networking software that leverages eBPF. But beyond the practical use, the project itself is one place I have scratched the “craftsmanship” itch for building software. So I’m starting from the ground up, as evidenced by an old post1 I wrote years ago.
This post documents how I figured out the details of building UEFI-based disk images.
Starting Off
The easiest method I know of to run a Debian VM is download one of the cloud images2, e.g.
$ curl -L -o bookworm.qcow2 https://cloud.debian.org/images/cloud/bookworm/20240901-1857/debian-12-nocloud-amd64-20240901-1857.qcow2
$ qemu-system-x86_64 \
  -drive id=disk,file=bookworm.qcow2,if=none,format=qcow2 \
  -smp 1 -m 512M \
  -device ahci,id=ahci \
  -device ide-hd,drive=disk,bus=ahci.0 \
  -nic user \
  -no-reboot \
  -enable-kvm \
  -cpu host \
  -nographic
This works great for a simple machine. If all you care about is getting up and running, start here. I want to be able to control the build process and make all my own decisions.
The cloud image boots into Grub via SeaBIOS (the default bios used by QEMU). I have installed Grub onto a disk image before; it’s not too bad:
$ cat <<EOF | sfdisk disk.img
label: dos
unit: sectors
sector-size: 512
start=2048, type=83, bootable
EOF
$ sudo losetup -Pf --show disk.img
$ sudo mkfs.ext4 /dev/loop0p1
$ mkdir /tmp/build
$ sudo mount /dev/loop0p1 /tmp/build
$ cd /tmp/build

# Not pictured: fill out the filesystem for a distro, e.g. debootstrap

$ sudo grub-install --target=i386-pc --boot-directory=boot /dev/loop0
$ cat <<EOF > boot/grub/grub.cfg
serial
terminal_input serial
terminal_output serial
set root=(hd0,1)
set timeout=0
linux /boot/bzImage root=/dev/sda1 rw console=ttyS0
boot
EOF
But how would you turn this into an application that can be distributed to users? I am bullish on the download-a-single-binary install process. That means making very few assumptions about what software exists on the target machine, be it shared libraries or utility programs that can be fork+exec’ed.
Tools like sfdisk, losetup, and mount are scrutable - I can either embed their library code or just make the syscalls myself from my program. But what about grub-install? The code is out there, but I’m not about to add that as a dependency. I want something simpler.
Direct Boot
It turns out that QEMU does not even require a bios - it can directly boot the linux kernel3. This is what I have been using for a long time. It works great and keeps the process of building a disk image very simple. mount, copy stuff in, umount and boot. I use the steps above but without the Grub installation.
The sticking point here is that you end up having to distribute two files: the kernel and the disk. In most cases (well, at least mine), the two are tied together. It is likely that the kernel needs to load modules, those modules are in the disk (since there is no initramfs), and the kernel and modules need to come from the same source version. In other words, you can’t build a new kernel and boot with with a disk that has modules built from the old version.
Even still, this does not matter much for local use. I do want to have multiple disk images sitting around for various projects, and I don’t want to have to remember which kernel goes with which disk. Sure, I could organize my directories to make it obvious or write the pairings to a file (almost like a boot menu), but again I’m not aiming for minimal or practical here.
So I need to figure out how slap the kernel and disk together.
Enter UEFI
A guy named Joonas wrote an incredible piece on BIOS and UEFI4. If you’re interested in this sort of thing, that’s a great place to start. Where I think I can add to it in my own post is offering more details of the steps involved, namely how to build a disk and boot it with UEFI from scratch.
In short, the disk image now needs a distinct partition, the EFI System Partition (ESP), that has an EFI executable in it, such as a bootloader. Fortunately, the linux kernel can be built as an EFI executable and used in place of a bootloader. The downside is that you cannot have multiple boot options that are selected from at boot, but that isn’t something I care for in the context of development VMs. There is a Kconfig option to enable this ability:
$ zcat /proc/config.gz | rg CONFIG_EFI_STUB
CONFIG_EFI_STUB=y
With the kernel in hand, let’s move on to formatting the disk.
$ sector_size=512
$ efi_start=2048
$ efi_size=$(($(echo '64M' | numfmt --from=iec) / ${sector_size}))
$ root_start=$((${efi_start} + ${efi_size}))
$ cat <<EOF | sfdisk disk.img
label: gpt
label-id: $(uuidgen)
unit: sectors
first-lba: 2048
sector-size: 512

disk.img1 : start=${efi_start}, size=${efi_size}, type=C12A7328-F81F-11D2-BA4B-00A0C93EC93B, uuid=$(uuidgen)
disk.img2 : start=${root_start}, type=0FC63DAF-8483-4772-8E79-3D69D8477DE4, uuid=$(uuidgen)
The size attribute is missing, so the second partition will grow to the available space. The ESP only needs to be large enough to store the kernel, and 64MiB is plenty of space. The disk can be any filesystem with a valid init program, but I’ll use Debian here.
$ git clone https://salsa.debian.org/installer-team/debootstrap
$ export $DEBOOTSTRAP_DIR=$(pwd)/debootstrap
$ root_size=$(sfdisk -d disk.img | tail -n 1 | sed -E 's/.*size=\s*([^,]*),.*/\1/')
$ sudo losetup --offset $((${sector_size} * ${root_start})) --size-limit $((${sector_size} * ${root_size})) /dev/loop0 disk.img
$ sudo mkfs.ext4 /dev/loop0
$ sudo mount /dev/loop0 /tmp/build
$ sudo -E $DEBOOTSTRAP_DIR/debootstrap --arch=amd64 --include=linux-image-6.1.0-25-amd64 bookworm /tmp/build http://deb.debian.org/debian/
$ sudo cp /tmp/build/boot/{vmlinuz-6.1.0-25-amd64,initrd.img-6.1.0-25-amd64} /tmp
$ sudo umount /dev/loop0
$ sudo losetup -d /dev/loop0
By default, debootstrap does not install a kernel or its modules, which is why I have explicitly requested one. This saves me the time of building the kernel myself, and
The steps for mounting the ESP are similar, but the file system must be a FAT (mkfs.fat -F 32). After mounting it to /tmp/build, copy in the kernel and initramfs:
$ sudo cp /tmp/vmlinuz-6.1.0-25-amd64 /tmp/build/vmlinuz.efi
$ sudo cp /tmp/initrd.img-6.1.0-25-amd64 /tmp/build/initrd.img
The initramfs is not necessary in general. However, the debian kernel loads ext4 support as a module (CONFIG_EXT4_FS=m), so the kernel cannot mount the partition with the root filesystem at boot time. If this Kconfig option were set to y, the initramfs step can be skipped.
EFI Vars
The disk is finished, but we need the UEFI firmware in order to boot. The arch wiki explains where to get the firmware and which args to pass to QEMU5. I build QEMU from source, and the build system drops the firware in build/pc-bios/{edk2-i386-vars.fd,edk2-x86_64-code.fd}.
Much like Joonas, I had a terrible time modifying the EFI vars, which store the boot options and order. I do not understand this very well, but I have some tips to pass along.
It seems that by default, the UEFI firmware will try to netboot via iPXE and HTTP, all of which fail but take awhile to time out.
BdsDxe: failed to load Boot0001 "UEFI QEMU HARDDISK QM00005 " from PciRoot(0x0)/Pci(0x4,0x0)/Sata(0x0,0xFFFF,0x0): Not Found

>>Start PXE over IPv4.
  PXE-E16: No valid offer received.
BdsDxe: failed to load Boot0002 "UEFI PXEv4 (MAC:525400123456)" from PciRoot(0x0)/Pci(0x3,0x0)/MAC(525400123456,0x1)/IPv4(0.0.0.0,0x0,DHCP,0.0.0.0,0.0.0.0,0.0.0.0): Not Found

>>Start PXE over IPv6.
...
The last resort is to drop into the UEFI shell; the VM can then be booted via the shell commands.
Shell> fs0:
FS0:\> vmlinuz.efi console=ttyS0 root=/dev/sda2 rw initrd=initrd.img
This works, but I would have to wait for those other methods each time. I need to remove those boot options.
I have found several ways that should let me modify the boot order, but only one that reliably worked. Most of the time, the changes did not seem to stick, and I would have to wait for the netboot options to fail again.
efibootmgr
With the machine booted, log in and apt install -y efibootmgr. Running the command with no options prints the current boot entries:
root@localhost:~# efibootmgr
BootCurrent: 0006
Timeout: 0 seconds
BootOrder: 0000,0001,0002,0003,0004,0005,0006
Boot0000* UiApp
Boot0001* UEFI QEMU HARDDISK QM00005
Boot0002* UEFI PXEv4 (MAC:525400123456)
Boot0003* UEFI PXEv6 (MAC:525400123456)
Boot0004* UEFI HTTPv4 (MAC:525400123456)
Boot0005* UEFI HTTPv6 (MAC:525400123456)
Boot0006* EFI Internal Shell
root@localhost:~# for i in $(seq 0 6); do efibootmgr --delete-bootnum --bootnum $i; done
root@localhost:~# efibootmgr --create --disk /dev/sda --part 1 --label 'Debian' --loader '\vmlinuz.efi' --unicode 'console=ttyS0 root=/dev/sda2 rw initrd=initrd.img'
root@localhost:~# efibootmgr
BootCurrent: 0006
Timeout: 0 seconds
BootOrder: 0000
Boot0000* Debian
The result looks correct. Anecdotally, this only worked sometimes. I am codifying this whole process into a program, and as such have rebuilt and booted many, many machines. There were plenty of times where, after powering off and rebooting the machine, I hit the netboot options again. I have no idea why.
bootcfg
The UEFI shell has a builtin tool for modifying the boot order.
Shell> bcfg boot dump -v
Shell> bcfg boot rm 0  # repeaat for each entry
Shell> bcfg boot add 0 fs0:\vmlinuz.efi "Debian"
Shell> bcfg boot -opt 0x0 "console=ttyS0 root=/dev/sda2 rw initrd=initrd.img"
However, the last command fails for me with an invalid argument error. I was unable to get past this.
Boot Menu
There is a TUI built into the UEFI firmware, which can be entered by exiting the shell. This app reliably modifies the EFI vars and saves them, so it is the path I recommend.
Shell> exit
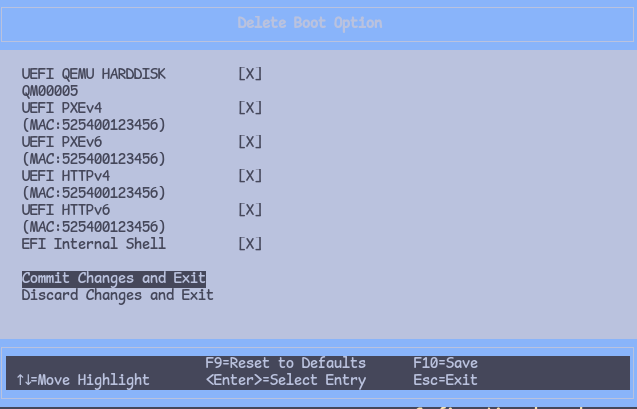
In the interface that pops ups, select the Boot Maintenance Manager option, then Boot Options, then Delete Boot Option. Mark every item in the list for deletion, then Commit Changes and Exit.

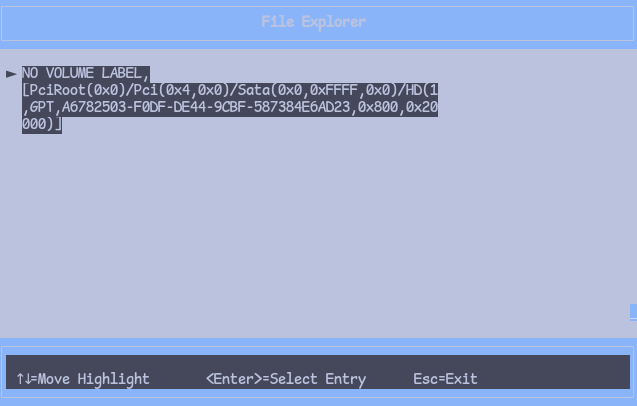
Next navigate to the Add Boot Option page, select the one disk that is available.

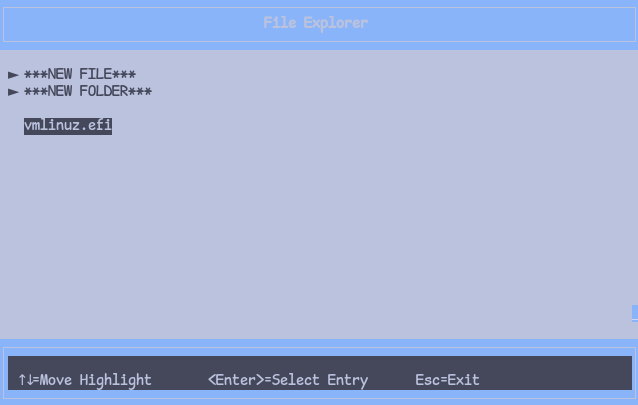
The vmlinux.efi should be the only entry; select it.

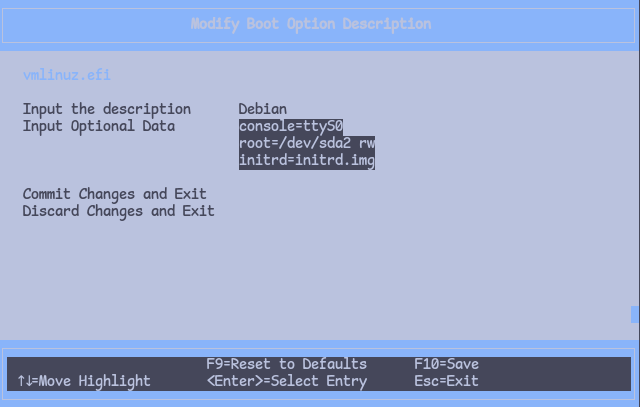
Then set the description and add the kernel command line.

All done! Jump to the root by hitting Esc a few times, then select Continue.
virt-fw-vars
https://gitlab.com/kraxel/virt-firmware
This tool deserves a shoutout. I hate that I am forced to actually boot the machine in order to simply modify a file. virt-fw-vars is capable of print and modifying EFI vars directly. I have not yet found a way to easily add a new boot optoin from scratch, but the source code has much of the inspiration I will need for that one day.
$ virt-fw-vars -i vars.fd --print
Boot0000            : boot entry: title="UiApp" devpath=FvName(7cb8bdc9-f8eb-4f34-aaea-3ee4af6516a1)/FvFileName(462caa21-7614-4503-836e-8ab6f4662331)
Boot0001            : boot entry: title="UEFI QEMU HARDDISK QM00005 " devpath=PciRoot()/PCI(dev=04:0)/SATA(port=0) optdata=4eac0881119f594d850ee21a522c59b2
Boot0002            : boot entry: title="UEFI PXEv4 (MAC:525400123456)" devpath=PciRoot()/PCI(dev=03:0)/MAC()/IPv4() optdata=4eac0881119f594d850ee21a522c59b2
Boot0003            : boot entry: title="UEFI PXEv6 (MAC:525400123456)" devpath=PciRoot()/PCI(dev=03:0)/MAC()/IPv6() optdata=4eac0881119f594d850ee21a522c59b2
Boot0004            : boot entry: title="UEFI HTTPv4 (MAC:525400123456)" devpath=PciRoot()/PCI(dev=03:0)/MAC()/IPv4()/URI() optdata=4eac0881119f594d850ee21a522c59b2
Boot0005            : boot entry: title="UEFI HTTPv6 (MAC:525400123456)" devpath=PciRoot()/PCI(dev=03:0)/MAC()/IPv6()/URI() optdata=4eac0881119f594d850ee21a522c59b2
Boot0006            : boot entry: title="EFI Internal Shell" devpath=FvName(7cb8bdc9-f8eb-4f34-aaea-3ee4af6516a1)/FvFileName(7c04a583-9e3e-4f1c-ad65-e05268d0b4d1)
BootOrder           : boot order: 0000, 0001, 0002, 0003, 0004, 0005, 0006
...
Conclusion
Stay tuned for the writeup of how these details have turned into Zig code.